It’s been about 6 months since I switched from Pro Tools (10) to Logic Pro X (10.3) and now that I’m fairly up to speed on the new platform I am so going to judge! If you’re thinking of switching and you assume the transition will be smooth, it won’t be (like that time I assumed I could get by in Portuguese by speaking Spanish with a German accent). But read on and fear not! Learn from my struggles! Laugh at my pain! And hopefully I can help you decide whether or not you should make the leap yourself.
To the question “will my stuff sound the same” the answer is “yes.” You’ll still get to your musical destination, it’ll just be in a car with the steering wheel on the opposite side and when you reach to turn on the radio you hit the AC. You’ll be able to record, pan, automate, send to busses, edit, quantize, and generally futz with your signals to your heart’s content. You’ll be able to bring along any 3rd party instruments and plug-ins that use Audio Units, as I was able to use the BFD2 drum sample player and library from FXPansion, my Session Horns and Session Strings libraries for the Kontakt 5 player from Native Instruments, and 3 virtual instruments from AIR Music Technology. I was even able to route the extra sends from BFD2 into a bus in my Logic mix, very helpful when using the kick drum to activate a side chain compressor for the bass.
Bundled with Logic is an impressive group of instruments and samples, but I did find myself missing a couple of things that came bundled with Pro Tools. The first thing I missed was the Mini Grand virtual piano instrument from AIR Music Technology. There are a couple of grand piano presets in the ES24 sample player that comes with Logic but the sound just doesn’t compare. Mini Grand has such a rich and full sound I used it exclusively for piano (my song Flashback Wife on my latest album A/B is just the Mini Grand accompanying the vocal and it works beautifully).
I also missed the XPand!2 module from my Pro Tools bundle, and I realized this when searching for—of all things—orchestra hits (don’t judge! O.K., judge a little). I couldn’t believe Apple didn’t have anything approaching an orchestra hit in all of its instruments and patches. Has their millennial-oriented marketing overlooked 80s and 90s cheese!? At the risk of saying that lack of orchestra hits was almost a deal-breaker, lack of cheesy orchestra hits was almost a deal-breaker, so I contacted AIR Music Technology to see if I could get Audio Units versions of Mini Grand and XPand!2. Their customer service sent me to a different vending site based in a different country, who offered me the Xpand!2 module for $1 and the rest of their entire suite of instruments for another $75.
One dollar? Eight instruments for $76? I worried that I was being taken by an Estonian hacker who would soon identity thieve all of my info and take out three mortgages, but the important thing is I got my preferred piano back, as well as the orchestra hits. Now I can produce all of the 80s hair metal and 90s R&B. And joking aside, the XPand!2 module is a great tool because you can layer 4 different patches in one instance of the plug-in, with 2 internal effects busses so you don’t have to eat up mixer real estate with extra channels and faders (more on that later). Well worth the extra few bucks to bring over to Logic.

Aside from the above mentioned omissions, the instruments and samples packaged with Logic are an impressive lot, and give you much more flexibility than those bundled with Pro Tools. Logic has a diverse array of drum machine sounds compared to Pro Tools’ Boom drum machine, along with a variety of synth modules, a great B3 organ, electric piano (though I still prefer AIR’s Velvet), and even a Vocoder. If you’re trying to assemble a project studio from scratch you can’t beat the value of Logic at $199.
My favorite thing about working in Logic is the way it handles and displays MIDI data. When you double click on a MIDI region in Pro Tools it opens the region in the MIDI editor window, which is a separate window that opens on top of the arrange window, like a pop-up ad (and who doesn’t LOVE pop-up ads?). Double clicking a MIDI region in Logic opens an edit window in the bottom of the main arrange window, and you can easily move back and forth between the arrange timeline and the MIDI editing window. You can set up different tools for your cursor in the edit window and the arrange window so you don’t have to keep changing them for the different tasks you’ll be doing in the different areas. It feels like a much smoother workflow.


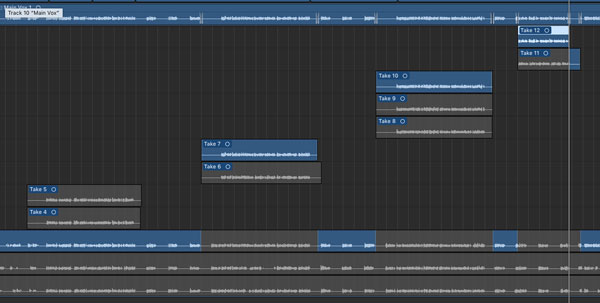
But what Logic giveth in smoothness it taketh back in the way it handles multiple takes of a track. I find it to be a mess compared to Pro Tools’ playlist structure. In Pro Tools, alternate takes are called “playlists” and you can punch into the current playlist much as you want. You can punch in each verse or, as I’ve had to do sometimes with rap vocals, every couple of lines. You can cobble together a take of the full song before you create a new playlist to start working on a new take. This gives you nice, full takes stacked vertically when it comes time to comp together the final vocal.

Logic, on the other hand, creates what it calls a “take folder” in your timeline and once you start punching in, every new take is stacked vertically. If you punch in every 2 lines, by the time your rapper has spit* (*I’m so hip) 16 bars you’ll have 8 takes stacked vertically in your take folder. If you want to record each of those 2 lines 4 times then, well, there’s math involved, but there’s a lot of files in a stack that you have to scroll through when it comes time to comp together the final vocal track.
I also find Logic’s whole way of handling punch in recording more tedious than Pro Tools. In Pro Tools you simply highlight the section of audio you want to record over, hit record and the playhead starts 1 or 2 bars before the selection (depending on how you’ve set your count-in preference). In Logic you have to put the app into punch in mode and then select the range into which you want to punch, and then set the playhead manually to where you want to start playback. In fact, playhead placement in Logic has been a continuing pain in my bum since I switched. Pro Tools can be set to always go back to where the playhead was when you started recording or playing, which is great when trying to punch in a specific portion of a guitar solo because if you screw it up you can hit stop (or better yet Command-period to stop and delete the current recording), then hit record again and you’ll start back at the same place as the previous attempt. Logic, for some reason that probably makes sense to software engineers but not musicians, won’t reset the playhead. If you record a section, hit stop, then want to record that same section again you have to reset the playhead manually or use loop recording, which is a pain in a different ass because if you do nail the passage you have to rush to hit stop before the recording loops back and starts over.
Another Logical aggravation is the amount of channels that can pile up when you use premade instrument patches from the library. When you select a patch from the library it will enter your project with sends to reverbs, delays, and more, so what you thought would be one channel strip will take up 3–5. The drum machine presets are even crazier as you’ll get a channel for each sample (kick, snare, hi-hat, hand claps, etc.) in addition to busses and effects. I chose the “Neon” drum machine preset and found 32 channels buried in my mix window. Logic will fold them up into a “track stack” to keep them out of sight but I know they’re in there, unwanted, created against my will, messing with the feng shui of my mix window.

And then there are the administrative duties. Pro Tools handles files the way a desktop publishing application handles images, in that it doesn’t bring the audio file into the project, it uses a reference to the audio file to place the audio where it needs to be. The audio is stored in a separate audio folder which keeps the file size of a Pro Tools project very small. If you want to save alternate mixes of a project (which is always a good idea when dealing with indecisive clients, or indecisive me) you can save a copy of your project without eating up hard drive space because all you’re copying is the mix file, which is usually under 1 MB. When working in Pro Tools I save a mix every night and copy a new one at the start of the next day’s session. To get old files out of the way I can move old mixes into an “old mixes” folder for that project and can thus go back to every iteration the project has gone through. If I need to go back and reference an plug-in setting or EQ from an old mix, it’s there.
Logic, on the other hand, stores all of the audio in the main project file—technically a “package”—which results in a project file size that can range from 300MB to 1GB for a 3-minute pop tune. If you start saving copies you can eat up drive space pretty quickly. The solution Logic employs to save alternate mixes is to create a “Project Alternative” within the project file, which can be accessed via a dropdown menu under the file menu. This creates a disincentive to save your mixes every day because once you get to a bunch of project alternatives the drop down menu starts to look like the font menu in Word. There’s no way to move older mixes out of the way, as you could if you create an “old mixes” folder in which to dump Pro Tools project files. Your only option is to delete unwanted project alternatives, losing them forever.
So, was it worth it to switch? Despite my few specific grievances, yes. I needed to update the system software on my iMac, which would have required the $299 “license renewal” for Pro Tools, along with a $99 per year fee after the first year to receive updates, and another $500 or so to up- or crossgrade the amp modeling plug-in that would be rendered useless in the new setup. At $199 Logic has the same power with more plug-ins and free updates so I thought I should give it a try. I did have to repurchase the Melodyne plug-in from Celemony for pitch correction and waveform editing because the Logic flex pitch function just didn’t work well on correcting vocal pitch, so factor at least another $99 for the basic version of Melodyne (or $249 for a more robust version).
The important thing is that the music sounds just as good when I’m done working on it. I like the compressors and EQ plug-ins better in Logic, and I can deliver professional sounding .wav, .mp3s, or whatever format is needed. And now that I’ve updated my system software I can finally back up my phone.
Update: I also posted this article on Linkedin and Medium, because I’m taking my work to the people!
Thank you!!! I use both as well but PT’s my crutch. The audio editing is hard for me on logic but the stability in VI’s on logic is great. You still on Logic?
Yeah, still on Logic for now, I like the way it lets you work with MIDI and the mix automation. I’ll probably bring Pro Tools back at some point for certain projects, I agree about the audio editing in Logic. Their take folders still frustrate me 😛
Thanks for reading!