I am overjoyed to report that I have found a solution to one of my biggest complaints when switching from Pro Tools to Logic Pro X! (I compared the two in a previous post) The efficient workflow I relied on for recording vocals in Pro Tools became ungainly in LPX, but after multiple deep dives into user groups and forums I stumbled on one little feature that changed the game. Yes, like internet clickbait headlines I’ve discovered “one simple trick” to make your vocal workflow better.
To save you time the trick is the “Pack Take Folder” feature, and if you want to skip ahead to my explanation of how to use it, jump to the “Pack Take Folder” section below. First I’ll explain why I was looking for something like this in the first place and why it was so crucial to me for recording vocals.
The Problem
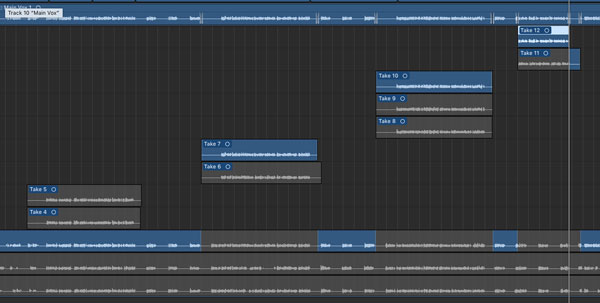
As I mentioned in my PT to LPX comparison essay, the way LPX automatically creates take folders makes the workflow for recording vocals an absolute mess. Each time you punch into the vocal track, even if it’s just for a couple of words or one verse, it creates a new take, adding to the vertical stack of takes and filling up screen real estate. The more takes filling up the screen, the more difficult it becomes to comp together the final vocal track because you’re constantly scrolling up and down to audition sections of audio. Even if you have “Replace Record” enabled, which is supposed to record new audio into the current track, it only works the first time through the song. Once you create a take folder and start on the second full vocal performance, each punch in, even with Replace Record enabled, creates a new take. And those takes add up quickly.
None of the tutorials I saw about comping vocals in LPX, addressed this issue. They all had singers happily singing an entire song three or four times through, resulting in only three or four takes to work with in the take folder. Who records like that? There’s no way you’re going to get the best performance singing the whole song a few times through. You’re going to need to punch in to get a word or line just right. The lead vocal is like a close up shot in a movie, every detail and nuance is magnified and you need to get the best and most compelling performance for each and every line.

In Pro Tools you could manually create a new take (their term is “playlist”) and punch into it as needed. You could take the time to get a good, full version of the song—line by line if you like—before you created the next full performance. This process gives you four or five (or however many you want) performances of the whole song, and when it comes time to comp the vocal track you only have to navigate four or five vertically stacked tracks.
It was incredibly frustrating and almost a deal breaker not to be able to use this Pro Tools vocal recording workflow in Logic Pro X.
Except, you can.
Using this one simple trick! The “Pack Take Folder” function that’s buried in a pop-up menu you can only get by clicking on multiple audio regions!

Pack Take Folder
To use this feature to make Logic Pro X vocal recording more like Pro Tools, you’ll need to record each vocal performance on a new track. When you have all of your full-length performances where you want them—punching in over mistakes, going verse by verse, whatever—you use the “Pack Take Folder” to combine the tracks into a take folder. From there you can use Quick Swipe Comping to comp together a final vocal track. I’ll elaborate:
The first step to this workflow is to set LPX into “replace record” so you can punch in to your vocal track without creating new takes. You can record one verse at a time, punch in to fix a blown note or bad diction, all without creating a new take folder. Take folders are your enemy (for now)!
When you’re happy with your first full performance of the song and want to start the second, instead of creating a new take, duplicate the entire vocal track. I do this by option clicking the track header of the vocal track and dragging it down until you see a transparent copy of the track floating under your mouse. Release the mouse button and a new track is created with the same plugins and bus sends. I rename the tracks “vox take 1” “vox take 2” etc., delete the copied audio regions in the new track, mute the previous track, and then start recording.
You can punch into each track as needed, getting useable, full performances on each. Repeat this process until you’re confident you have enough good performances of the whole song to make a final comp, or until you’re singer gives up and says “make it work!”
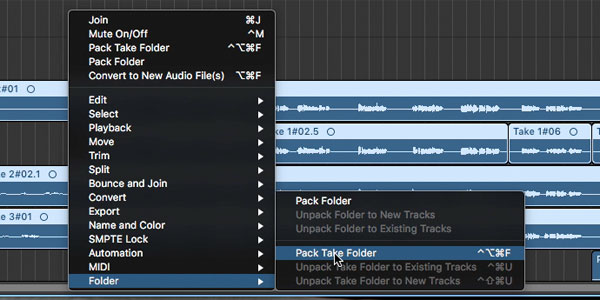
Now it’s time to Pack Take Folder, a feature so buried I didn’t know it was there for a full gall-darn year. Shift click the track headers of all of your vocal tracks, which will select all of the audio regions in all of the tracks (they should be highlighted). Next, right-click (or option-click) on one of the highlighted audio regions to get a pop-up menu. Select the word “Folder” at the bottom of the pop-up menu for the submenu, then select “Pack Take Folder.” You can also press Command-Option-Control-F if you have enough fingers and can remember that.
Now all of your separate vocal tracks are moved into a take folder on the top track. The new take folder behaves like any other, allowing you to Quick Swipe Comp, create alternate comps, etc.
Cleaning Up The Vocal Workflow
Once you have your vocal comp together (there are plenty of tutorials on comping) there’s one more step to mirror the Pro Tools workflow: exporting the comped vocal to a new track. You do that by clicking the letter at the top of the take folder to get the drop down menu, then selecting “Export Active Comp to a New Track.” This creates a new track with the comped vocal as audio regions rather than a take folder. You need to do this to strip silence, add fades to the beginning and end of each audio region, and do the other vocal cleanup stuff you need to do before mixing. I prefer to export the comp rather than flattening it because once you flatten a comp you can’t go back! I save the original comped vocal track containing the take folder (and mute it, of course) in case I want to go back and pick a different take for a word or line, which, if you’re recording for clients, is something they’ll always want to do.
So there you have it: One Simple Trick that has helped me immensely by streamlining my vocal workflow and making it more efficient and Pro Tools-like. I still prefer the way Pro Tools handles playlists over Logic Pro X’s take folders, but with this workaround the difference is much more manageable and most importantly, the dread of an unwieldy take folder won’t discourage me from punching in to get a line just right.
Let me know if this process works for your or if you have any thoughts, questions or suggestions!
I’ve also cross-posted this on Medium and linkedin because, well, social media.


Hey Rob! I was trying to remember how to do something in Logic and came across your blog. I wanted to keep using my beloved Take Folders but punch in on take one for example and not have it make a new take but rather just record on the same “lane” so to speak. I finally remembered how to do it and thought I’d share, although maybe you’re hip to this already. Record a take as normal. If you’re punching in along the way then use “replace”mode so that a take folder is not created. When doing a 2nd full length take first you want to select the track you just recorded and pack it into a take folder. Now, make sure “replace” is turned off and start recording your 2nd take. When you want to punch in on that 2nd take and not create another “lane” above it make sure to turn on “replace” again. Then, go to your take folder and make sure you have “Take 2” selected instead of the comp. Now when you punch in you’ll be punching into the same “take 2” lane. When you want to start a 3rd take, turn off “replace” again to start it so that a new lane is created and then turn on “replace” and make sure “take 3” is selected in the drop down menu and finish it up. When you’re all done comp away. Now, I never do this btw but I’m glad I remembered how and now I might do it occasionally depending on what I’m working on. Usually my messiest track is a lead vocal track when it comps to unruly comps. I usually split up the folder though into vs, chorus, etc. so that each part has it’s own folder instead of having a gigantic thing that includes all the parts of the song.
Thanks for sharing the tip! I’ve been trying a few different ways to manage different takes of vocal tracks in Logic since I wrote that post. I know I’ve tried to switch back and forth between replace record and auto-creating new take lanes, but it always seems that if I let it auto-create a new take lane it will keep doing that from then on, even if I try to go back to replace record. Maybe it’s because I have the comp selected and not the individual take, as you describe.
Thanks again for taking the time to share your suggestion, I appreciate and will give it a try on my next project! 🙂
Thanks Rob for this article, particularly your explanation of the problem (“who records like that?”). I record a lot of singers too and yes, they’re always gonna call you up a month later and ask, “Do we have another ‘love’ in bar 37?
I’m coming from Digital Performer to LPX, and I’ve always just worked in overdub mode so all the little overdubs are stacked up in one track. Then I just drill down to find alternates. On the face of it, it seems LPX take folders are a great idea, but as you say, those takes add up and pretty soon you’re scrolling vertically through a couple hundred of them.
Here’s a simple workaround for that. Record your first take and all the little overdubs, creating the aforementioned stack of takes, but don’t worry about comping them just yet. Then you can go back to the top, select the first set of takes on the same section, and drag them all up to the top. Go on to the next set and the next. It only takes a couple of minutes, and you’re left with only as many takes as the most overdubbed phrase. No more vertical scrolling. If you have to do more takes, you can just drag them up too when you’re done.
Thanks for the workaround, Mike, I’m gonna try that out on my next vocal session. I found a workaround that I’ve been using in Logic, I wrote about it over at medium: https://medium.com/@RobPRocks/one-simple-trick-for-recording-vocals-in-logic-pro-x-92fb7a12903d It involves recording full versions of the lead vocal on individual audio tracks, allowing me to punch in destructively or one verse or phrase at a time. Then when I have 4-6 full vocal tracks (complete with punched in phrases, corrections, etc) I use the “Pack take folder” function to convert the multiple vox tracks into a take folder for easy comping 🙂